
Ever spent hours sculpting a custom character in Blender, only to watch it fail to load properly in Source Filmmaker? Or watched a carefully UV-mapped prop turn into a purple-and-black checkerboard nightmare? That frustration usually traces back to one critical stage: the sfm compile process. Mastering sfm compile turns raw 3D exports into fully functional assets that pose, animate, and render cleanly inside Source Filmmaker. This guide walks you through the entire pipeline with practical steps, real troubleshooting advice, and the kind of details that separate working models from broken ones.
Whether you are bringing in original characters, props, or converted assets, the compile step sits between your 3D software and the Source engine. Get it right and your models behave predictably. Get it wrong and you chase path errors, missing sequences, or scale problems for hours. Let’s break the whole thing down so you can move from export to in-engine asset with confidence.
What SFM Compile Actually Means
SFM compile is the process of converting intermediate model data (usually SMD or DMX files), a QC instruction script, textures, and materials into the binary formats Source Filmmaker understands. The main outputs are typically .mdl (the model), .vvd (vertex data), .vtx (optimized mesh data), and sometimes .phy (physics/collision).
Think of it like packaging a finished product for a specific store shelf. Your Blender file is the workshop prototype. The compiler (StudioMDL, usually driven through Crowbar) packages everything according to the rules the Source engine expects. Without this step, Source Filmmaker simply cannot read your geometry, skeleton, or materials the way you intended.
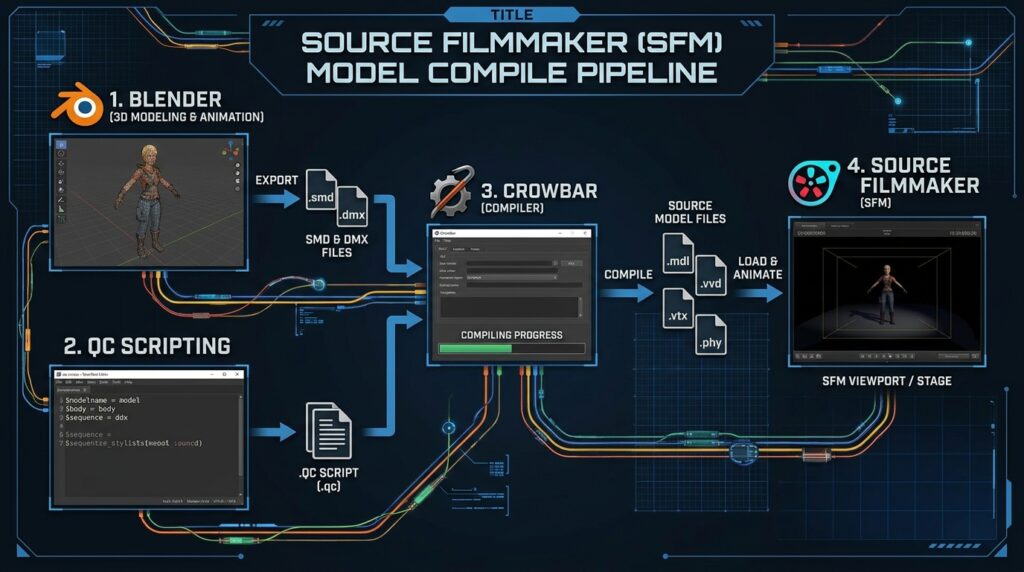
The typical pipeline looks like this:
- Model, UV, and rig in Blender (or Maya/3ds Max)
- Export reference mesh, physics mesh, and animations as SMD or DMX
- Convert textures to VTF and write matching VMT material files
- Write a QC file that describes how everything fits together
- Run the compile through Crowbar or studiomdl.exe
- Place the results in the correct usermod folders and test in SFM
Most failures happen in the export, QC, or path stages rather than inside the compiler itself. Understanding each piece removes the mystery.
Essential Tools for a Smooth SFM Compile Workflow
You do not need expensive software. Nearly everything is free and community-supported.
- Blender + Blender Source Tools: The most common modeling and export combination. Blender Source Tools adds proper SMD and DMX export options tailored for Source.
- Crowbar: The graphical front-end almost everyone uses. It wraps Valve’s studiomdl.exe, shows clear logs, handles game configurations, and can also decompile existing models so you can study how they were built.
- studiomdl.exe: The actual compiler that ships with Source Filmmaker (usually in the bin folder). Crowbar calls this under the hood.
- VTFEdit (or VTFCmd): Converts PNG/TGA textures into Valve Texture Format (.vtf) and helps generate basic material files.
- Notepad++ (or any good text editor): For writing and editing QC and VMT files with readable formatting.
- HLMV (Half-Life Model Viewer): Optional but useful for quick checks of compiled models outside of SFM.
Set up Crowbar carefully the first time. Point it at your Source Filmmaker installation and the usermod folder so compiled files land where SFM can find them. A correct game configuration saves endless “model not found” headaches later.
Step 1: Prepare Your Model Cleanly
Start with clean geometry. Apply all transforms (location, rotation, scale) in Blender before export. Keep names simple: lowercase letters, numbers, and underscores only. Spaces and special characters cause path problems downstream.
For static props, a single mesh is often enough. For characters you need a proper armature with sensible bone names and solid vertex weights. Source expects a humanoid-ish scale in many cases (roughly 72 units tall for a standing adult character, since Source units are approximately inches). Test scale early.
Separate a simplified collision mesh if the prop or character needs physics. High-poly visual meshes make terrible collision shapes and can tank performance or cause weird behavior.
Organize your working folder clearly. A practical structure looks like this:
text
my_asset/
├── modelsrc/
│   ├── character_reference.smd
│   ├── character_idle.smd
│   ├── character_physics.smd
│   └── character.qc
└── materials/
    └── models/
        └── custom/
            └── character/
                ├── character.vtf
                └── character.vmt
Keeping source files and final content paths distinct makes troubleshooting far easier.
Step 2: Export to SMD or DMX
Use Blender Source Tools for export. SMD is the older, widely compatible format and works well for most props and basic characters. DMX carries more data and is preferred when you need facial flexes or more complex animation data for SFM.
Export at least:
- A reference (or “studio”) mesh that includes the bind pose and skeleton
- Any animation sequences as separate files
- A physics/collision mesh if needed
Double-check that the export includes the armature for rigged models. Missing bones produce models that compile but refuse to pose. Also confirm the Engine Path in Blender Source Tools points to your SFM bin folder when using DMX, so the export matches what the compiler expects.
Step 3: Convert Textures and Create Materials
Source does not read PNG or TGA files directly for models. Convert them to VTF using VTFEdit. Use power-of-two dimensions (512×512, 1024×1024, 2048×2048). Choose DXT1 for opaque textures and DXT5 when you need alpha transparency. Generate mipmaps.
Next create a matching VMT file. A basic VertexLitGeneric material looks like this:
text
"VertexLitGeneric"
{
    "$basetexture" "models/custom/character/character"
    "$phong" "1"
    "$phongexponent" "25"
    "$phongboost" "1"
}
The path inside $basetexture is relative to the materials folder and should not include the .vtf extension. Place both the .vtf and .vmt in the materials tree that matches the $cdmaterials path you will put in the QC file. Mismatched material paths are the number one cause of purple checkerboard textures.
Step 4: Write a Solid QC File
The QC file is the instruction manual for the compiler. It is plain text and usually short for simple assets. Here is a minimal working example for a static prop:
text
$modelname "custom/myprop/myprop.mdl"
$body "Body" "myprop_reference.smd"
$cdmaterials "models/custom/myprop"
$surfaceprop "metal"
$sequence "idle" "myprop_reference.smd" fps 30
$collisionmodel "myprop_physics.smd"
{
    $mass 25
    $concave
}
Key commands you will use constantly:
- $modelname: Sets the output path and filename relative to the models folder.
- $body (or $model for models with flexes): Points to the reference mesh.
- $cdmaterials: Tells the engine where to look for VMT files under the materials directory.
- $sequence: Defines animations. Even static props need at least one (usually called idle).
- $surfaceprop: Controls impact sounds and physical behavior.
- $collisionmodel: Adds physics data.
For characters add multiple $sequence lines, $bodygroup blocks for interchangeable parts (hats, weapons, clothing), $texturegroup for skins, and flex controllers if you exported shape keys. Start simple. Get a basic version compiling and loading before you add bodygroups, LODs, or complex physics. Order can matter; keep the structure clean and comment your lines so future-you can follow the logic.
Save the QC next to your SMD/DMX files. Paths inside the QC are usually relative to the QC’s location or absolute relative to the game content folders. Consistency is everything.
Step 5: Compile with Crowbar
Open Crowbar, go to the Compile tab, select your QC file, and confirm the correct Source Filmmaker game configuration is active. Hit Compile and watch the log window.
A successful compile lists the files it wrote (MDL, VVD, VTX, etc.). A failed compile almost always names the exact problem and the line it failed on. Read the first meaningful error rather than only the final “Aborted” message. Common first-time issues include missing files, wrong filenames (case and extension matter), or paths that do not match the actual folder structure.
You can also run studiomdl.exe directly from a command prompt in the SFM bin folder if you prefer the command line:
text
studiomdl.exe -game "path\to\SourceFilmmaker\game\usermod" "path\to\your.qc"Crowbar is usually faster for iterative work because the log is right there and game setups are saved.
After a successful compile, confirm the files landed in the expected models folder under usermod. Restart or refresh Source Filmmaker if the model browser does not immediately show the new asset.
Common SFM Compile Errors and How to Fix Them
Most problems fall into a few buckets:
- Could not load file / missing SMD or DMX: Filename or path in the QC does not match the actual file. Check spelling, case, and relative location.
- Model has no sequences: You forgot a $sequence line or the sequence file failed to load. Even static props need one.
- Purple/black checkerboard textures: $cdmaterials path, VMT location, or $basetexture path is wrong. Verify the materials folder hierarchy and that both VTF and VMT exist.
- Model does not appear in SFM: Output path from $modelname does not match where SFM is looking, or files were not written to usermod. Confirm Crowbar’s game configuration.
- T-pose or broken animation: Skeleton missing from export, bad weights, or sequence references that do not match the reference armature.
- Huge or tiny model: Scale was not applied before export or units do not match Source expectations.
- EXCEPTION_ACCESS_VIOLATION or sudden abort: Often a bad mesh, too many vertices, or corrupted source data. Simplify and re-export.
- Physics not working: Missing or incomplete $collisionmodel block.
The compile log is your best diagnostic tool. Treat the first real error as the one that needs fixing; later messages are often just consequences.
Practical Tips for Characters vs Props
Props are the best place to practice. A simple crate or lamp teaches the full pipeline with fewer moving parts. Once that works, move to characters. Characters need a solid reference skeleton, clean weights, and usually several animation sequences. Facial animation benefits from DMX and proper flex setup in the QC.
Keep bodygroups and texture groups out of the first successful compile. Add them only after the base model loads and poses correctly. Use descriptive names for sequences and bodygroups so the SFM animation sets and bodygroup menus stay readable.
Test early and often. Load the model in HLMV or directly in SFM after every major change. A five-minute test saves hours of compounding errors.
Next Steps and Takeaways
Mastering sfm compile is less about memorizing every QC command and more about building a repeatable, organized pipeline. Clean exports, consistent paths, a readable QC, and careful log reading solve the vast majority of problems.
Quick checklist for your next project:
- Apply transforms and clean names in Blender.
- Export reference, physics, and sequences with Blender Source Tools.
- Convert textures to VTF and write accurate VMTs.
- Write a minimal QC and expand only after the first success.
- Compile with Crowbar, read the full log, and fix the first error.
- Place files correctly and test in SFM.
- Iterate.
Once the basics feel automatic, experiment with bodygroups, skins, LODs, and more advanced physics. Decompile a few official or well-made community models in Crowbar to study how experienced creators structure their QC files. The community has produced excellent examples you can learn from.
Share your first successful custom model or the error that stumped you the longest in the comments. The more people document real solutions, the smoother the path becomes for the next artist who hits the same wall.
FAQs
What does “sfm compile” actually mean?
SFM compile is the process of turning your exported 3D model data (usually SMD or DMX files), a QC instruction file, and textures into the binary formats Source Filmmaker can read. The main results are .mdl, .vvd, .vtx, and sometimes .phy files. Without this step, SFM cannot properly load custom geometry, skeletons, animations, or materials.
Do I need Crowbar, or can I just use studiomdl.exe?
You can use studiomdl.exe directly from the command line, but Crowbar is strongly recommended for most people. It provides a simple graphical interface, saves game configurations, shows clear real-time logs, and makes it much easier to spot and fix errors. Crowbar still uses the same studiomdl compiler underneath.
Why does my compiled model show up as a purple and black checkerboard in SFM?
This almost always means a material or texture path problem. Check that your $cdmaterials path in the QC file matches the actual folder where the .vmt and .vtf files are located, that the $basetexture path inside the VMT is correct, and that both files exist in the right materials directory under usermod. Spelling, case, and folder structure matter.
What is the difference between SMD and DMX when exporting for SFM?
SMD is the older, simpler, and more universally compatible format. It works well for most props and basic characters. DMX is newer, carries more data (especially useful for facial flexes and complex animations), and is preferred for advanced character work in Source Filmmaker. Start with SMD if you are new; switch to DMX when you need the extra features.
Why does Crowbar say “model has no sequences” even though I exported animations?
Every model needs at least one $sequence entry in the QC file, even static props. The most common causes are a missing $sequence line, a typo in the animation filename, or the sequence file not being in the same folder as the QC. Add a simple idle sequence that points to your reference mesh if you do not have separate animations yet.
How do I set the correct game path in Crowbar for Source Filmmaker?
In Crowbar, go to the Set Up Games tab, add or select Source Filmmaker, and point the Gameinfo.txt path to your SFM usermod folder (usually something like …\SourceFilmmaker\game\usermod\gameinfo.txt). Also make sure the Model Compiler path points to the correct studiomdl.exe inside the SFM bin folder. An incorrect game setup is one of the most frequent reasons compiled models never appear in SFM.
Should I start with a character or a simple prop when learning sfm compile?
Always start with a simple static prop. Props have fewer variables (no complex skeleton, weights, or multiple sequences), so you can focus on learning the core pipeline: clean export, correct QC paths, texture conversion, and reading the compile log. Once a basic prop compiles and loads cleanly, move on to rigged characters.
You May Also Like: Gaymetu E: The Complete Guide to Identity and Expression in Gaming